Sourdough: tips, advice and troubleshooting

Here’s how to fix some problems that might occur when you make your sourdough, as well as some advice for optimizing its use.

Inactive Sourdough

You bought your dehydrated sourdough a few days ago. Even after you carefully follow our method, it still doesn’t seem very active; it produces hardly any bubbles, or none at all…

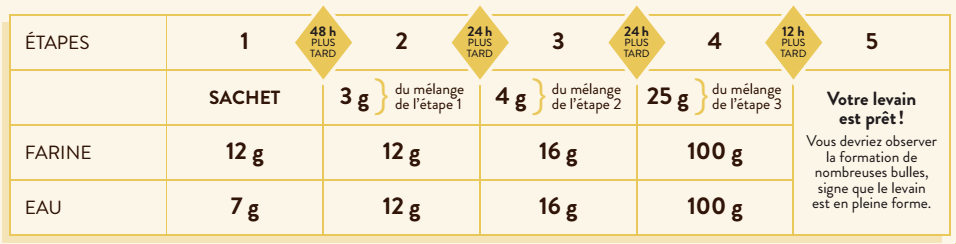
Check the temperature of the room its sitting in. Too cool an environment can slow the process down. It also sometimes happens that the sourdough may need a little more time to fully wake up. In that case you can repeat stage 4 of our method by keeping 25 g of the mixture and feeding it with 100 g of flour and 100 g of water.

A coating of liquid on the sourdough

When sourdough is not suitably fed, a coating of brownish or black liquid may form on top of it. That doesn’t mean that your sourdough is finished. Just mix everything with a spoon or a fork. Once it’s well mixed, all you need to do is feed your sourdough once again for a recipe to be made 12 hours later.

My sourdough gives off a smell of alcohol or nail polish

It’s a sign that your sourdough’s hungry! Just put aside 25 g, add 100 g of flour and 100 g of water. That should have it back in top shape.

In general, freshly fed sourdough needs 12 hours to be ready for use in a recipe. At that point it will start to produce bubbles. In certain cases, it might be ready sooner (in warmer temperatures, for example).

Appearance of mold

It’s extremely rare for mold to form, since the yeasts and bacteria in sourdough that’s in good shape fight them off, but all the same it’s possible.

If the infected area is minimal and well defined, remove it, feed your sourdough, and observe it well. If the mold has disappeared and the sourdough seems normal, then you’ve saved it!

If the mold is too widespread, you’re better off throwing out the whole thing and starting over from the beginning with a new sourdough.

Pizza dough recipe

Here’s a pizza dough easy to make at home with just 4 ingredients. A guaranteed success that will be enjoyed by your guests and your family.

Ingredients

Sourdough at room temperature, fed 12 hours earlier

124g

Water at room temperature

300g

White flour

495g

Salt

11g

Preparation

  1. In a bowl, mix the sourdough and water by hand.
  2. Add the flour and salt. Mix everything well by hand; avoid kneading the dough.
  3. Cover and let sit 1 hour at room temperature.
  4. Fold the dough over on itself 4 times, taking care not to knead it.
  5. Let sit for 2 hours at room temperature.
  6. Shape into a ball and let sit for another 20 minutes.
  7. With a rolling pin, make a round dough 12 to 14 inches in diameter.
  8. Dress the pizza with your favorite ingredients.
  9. Let sit for 30 minutes.
  10. Bake in a 450 °F oven until the internal temperature of the dough reaches 205 °F – about 15 minutes – or until the dough is lightly browned.

Spelt bread recipe

Here’s a recipe based on white flour and spelt flour. This low-gluten cereal was one of the first domesticated by man.

Ingredients

Room-temperature sourdough, fed 12 hours earlier.

200g

Water at room temperature

510g

White flour

580g

Spelt flour

240g

Salt

20g

Preparation

  1. In a bowl, mix the sourdough and water together by hand.
  2. Add the flours and salt. Mix everything well by hand; avoid kneading the dough.
  3. Let sit for 30 minutes at room temperature.
  4. Fold the dough over on itself 4 times, taking care not to knead it
  5. Let sit for 30 minutes at room temperature.
  6. Fold the dough over on itself 4 times, taking care not to knead it.
  7. Let sit for 30 more minutes at room temperature.
  8. Divide the dough into two 775 g balls.
  9. Let sit for 20 more minutes at room temperature.
  10. Shape the balls into two baguettes, into one miche or into one batard (a bread in between the shape of a miche and a baguette).
  11. Let sit in the refrigerator at 4 °C between 12 and 18 hours.
  12. Bake in the oven at 450 °F until the internal temperature is 205 °F. (Allow about 30 minutes for a bread that weighs 775 g before baking.)

Making a success of your miches and baguettes

Here’s some advice that will help you succeed in making the dough and in cooking your homemade sourdough bread in the form of miches (a round bread) or baguettes.

Working the dough

In most recipes you’ll be asked to knead the dough. However, at Boulangerie Desrosiers, we prefer to have the dough “work by itself.” Rest times are longer, but that lets you avoid having to knead the dough for long minutes. So it’s perfect for today’s busy schedules!

Just like kneading, our passive method makes the dough work so that gluten develops sufficiently. That allows the dough to be elastic enough to imprison the bubbles produced during fermentation. This is how you get a honeycombed bread with an interesting texture.

We recommend that you powder your work surface with a little flour to keep the dough from sticking. As indicated in our recipes, fold the dough on itself 4 times and let it sit 30 minutes between each folding. It will take between 3 and 4 foldings to develop the gluten sufficiently to make our bread.

Rest time

The key to success with your bread lies in respecting the indicated rest times. Your patience will enable the sourdough to do its work.

Baking

It’s important to preheat your oven. As soon as your bread is ready to go in, trace a few lines with a very sharp razor blade on top. This will allow the bread to expand a little more in the first minutes of baking.

When the internal temperature reaches 205 °F, remove your bread from the oven. Take it out of the pan and allow it to cool completely before slicing.

You’re now ready to get started on the production of your first sourdough bread. For more explanations, here are some additional articles:

Using and conserving your sourdough

Once your sourdough is activated, you can use it in a recipe. Obviously it can be used to bake bread, but also crepes, biscuits, pizza dough, and so on. Don’t forget to keep a portion for later use.

Optimizing use of your sourdough

  • Use a scale to weigh out your ingredients. You’ll get better results, because you’ll be more accurate. Baking is an art that demands precision!
  • Use a large container for our bread’s rest times. If you use too small a bowl, you risk harming the proper development of the gluten.
  • You can always change the type of your sourdough by feeding it a few times with another type of flower. That’s a way you’ll discover new flavors.
  • Certain actions can vary the flavors of the breads you bake. For example, you can influence their acidity.

To increase it...

  • Promote the production of acetic acid in your sourdough by:
    • Using a little less water to feed it with;
    • Using whole-grain flour;
    • Keeping the liquid that sometimes forms on sourdough.
  • Extend the duration of the bread’s fermentation by:
    • Letting the bread sit in a cooler place;
    • Pressing it (in order to remove gas) at least once during the rest phase.

After it sits in the refrigerator, leave it at room temperature for 30 to 60 minutes before baking.

In contrast, you can also have a milder bread by:

  • Using a sourdough fed more regularly;
  • Using a greater proportion of sourdough in your recipe.
  • More advanced users can try to use milk instead of water to feed their sourdough. Milk will lend breads a slightly chocolatey flavor, without chocolate.

Keeping your sourdough forever!

When your sourdough is in the best possible shape, 12 hours after being fed, it’s ready for use. But that’s also the moment to set aside a small portion of it, which you’ll use to develop it once again for later use. And the cycle begins again!

We suggest that you put aside 25g of sourdough each time you use it in a recipe. Then keep that little sourdough somewhere cold to conserve it until you need it.

  • In the refrigerator, you can keep it in hibernation for a maximum of 3 days.
  • In the freezer, it can hibernate for up to 2 weeks.

After those deadlines, your sourdough will have to fed once again. When it is, it will increase in volume, and you’ll be able to separate it once more to make a recipe.

To feed the sourdough:

  • Take it out of the fridge or the freezer. Defrost for 1 hour, if that’s how long it takes, then feed it by adding 100g of flour and 100g of water. Mix and let sit at room temperature.
  • It will be ready again 12 hours later to make a bread (it should have started making bubbles again).
  • Don’t forget to keep 25g for your next recipe.

However, if you reach the deadline and don’t wish to prepare a new recipe yet, you can simply weigh 3 g of it, then feed it with 11 g of flour and 11 g of water. It should start making bubbles again 12 hours later, and can therefore be put back in hibernation.

If your sourdough doesn’t seem to have reached the hoped-for condition or if a problem arises, read the article “Sourdough: tips, advice and troubleshooting.” You’re bound to find the answer to your questions!

How to activate your sourdough

Here you are on the point of activating your sourdough. You’ll see that the process is very simple and will only take a few minutes a day.

Once it’s ready, your sourdough will enable you to make extraordinary bread and a number of other recipes (pizza dough, crepes, biscuits…). Moreover, you’ll be able to keep it as long as you want by seeing that you always keep a bit aside for your next recipe and by feeding it properly.

ACTIVATION INSTRUCTIONS

Activation time: 5 days, 5 minutes a day

You’ll need:

  • Pouch of dehydrated sourdough
  • Organic four
  • Chlorine- and fluoride-free water (if you use tap water, allow it to sit for a day beforehand)
  • Glass container holding at least 500 ml

The type of sourdough you have will depend on the flour you feed it with. To preserve the flavors of the original sourdough, a flour made from the same grain has to be used. However, you can make the transition to another type of sourdough at any time by feeding it with a different flour. For example, to get a kamut sourdough, feed your sourdough with kamut flour a few times. This is a way of changing the taste of your breads and discovering new grains!

How to activate your sourdough

  • The ingredients must be at room temperature and be weighed in order to guarantee the success of the operation.
    Baking is an art that demands precision!
  • At each stage, mix the ingredients together with a fork. Allow the sourdough to sit at a temperature between 21 °C and 30 °C. Cover it with a piece of cloth or with plastic wrap, but not so it’s completely sealed.
    Don’t forget that sourdough is alive – and therefore has to breathe!
  • After each rest stage, keep only the specified amount of mixture.
  • The initial activation mixture is made up of the pouch to which you will add the amounts of flour and water specified in the table below in step 1

Sourdough table

Once the sourdough is ready, you can use it in a recipe.

Don’t forget to put part of it aside for your next use. For all the details, read the article  “Using and conserving your sourdough.”

Starting out in the world of sourdough


Starting out in the world of sourdough

Thinking you’d like to start producing your own homemade bread? Here’s some information to help you appreciate the interest in sourdough, and what differentiates slow-fermentation breads.

Sourdough is a symbiotic mixture of wild yeast and good bacteria that transform flour, and in so doing produce more digestible breads. This method of manufacture has been in use for millennia. Yeast turns carbohydrates into ethanol and into carbon dioxide, which will produce bubbles in the dough. That’s what makes it possible to have a honeycombed and tender bread. Next, the yeast bacteria transform the ethanol into lactic acid. And that’s what lends bread its characteristic taste and makes it longer lasting (bad bacteria don’t care for acidity).

What characterizes a sourdough long-fermentation bread?

  • Long fermentation (8 to 24 hours) gives the sourdough all the time it needs to weaken the gluten present in the flour. And thus we end up with a bread that's easier to digest. Some people who are gluten intolerant manage to consume sourdough bread with no problem at all!
  • Since you can set aside a little sourdough for later use, it’s an economical solution: there’s no need to buy more yeast every time you feel like making a recipe. It’s enough to have a bit of your old sourdough on hand.
  • As the fermentation process involves a transformation of sugars, sourdough bread causes a lesser increase in blood sugar. This is therefore a bread favored by people with diabetes. In addition, fermentation makes certain nutrients more easily assimilated by the body.

Basic principles in the use of sourdough

Allow enough time

Making sourdough bread is quite a simple process, but one that requires you to take the time to do things properly. First, you have to set aside a few periods to make sure that your sourdough is well fed. To learn how to do this, refer to the article “Using and conserving your sourdough.”.

Next, you have to allow for the necessary time to produce the bread itself. As you’ll discover in the recipes suggested in the above article, there are a few handling periods throughout the fermentation of the bread, but these are quite short.

Varying the type of flour used

The type of sourdough depends first of all on the type of flour you’ll be using to feed it. A whole-wheat sourdough will have been fed with whole-wheat flour, a rye sourdough with rye flour, and so on. There’s nothing to stop you from gradually changing the type of flour used to feed your sourdough – an original way of changing the taste of your breads and discovering new grains.

The same principle applies in your recipes. If, for instance, a bread recipe calls for 1,000 g of flour, you could choose to put in 500 g of spelt flour and 500 g of kamut flour. In the course of your experimenting you’ll make some happy discoveries!

Varying the uses of sourdough

Sourdough is highly flexible. Used above all for baking bread, it can also go into recipes for crepes, muffins and waffles, among other things.